Contact Book
For Web Applications Students Only
If you are doing the combined version of the Contact Book assignment, please see Contact Book - Combined
Objective
Use what you learned about Laravel to create a contact book web application, which allows a user to see and search through all contacts, add new contacts, and edit and delete existing contacts.
Project Setup
1. Clone the Repository
Clone this repository from GitHub and use the provided file to complete the assignment.
NOTE
If you are using Valet, save your repository in the Sites directory
NOTE
If you are using Laragon, save your repository in the {laragon}/www directory.
2. Create a Database
To create a database using phpMyAdmin, complete the following instructions.
- Open phpMyAdmin at http://phpmyadmin.test (macOS) or http://localhost/phpmyadmin (Windows)
- Log in to phpMyAdmin using the root username and password
- Click the Databases tab
- In the Create database from, enter
contact_bookfor the database name. - Click the Create button
3. Install Laravel Dependencies
Install Laravel dependencies using composer
Using the terminal, navigate to the cloned repository directory and enter the following command:
composer install
4. Create Environment File
In the project, find the .env.example file. Rename the file to be .env. Update the .env file to point to the contact_book database.
Save the file.
5. Generate Key
Using the terminal, enter the following command:
php artisan key:generate
6. Test the site
In the browser, go to: http://contact-book-username.test
NOTE
If you are using Laragon, you will need to click the reload button in the Laragon window. This should automatically create a friendly URL for your Laravel project.
NOTE
If you are using Laragon and your friendly URL is not working, the following solution may work for you.
In the Laragon window, go to Menu > Apache > sites-enabled > your current laravel site
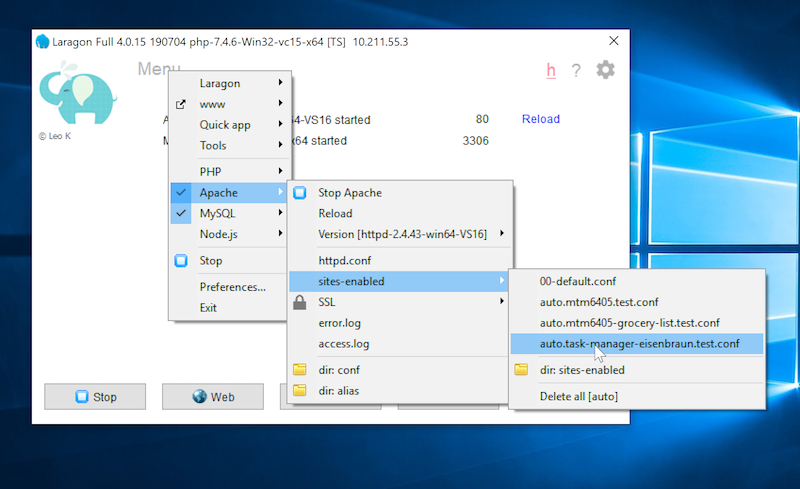
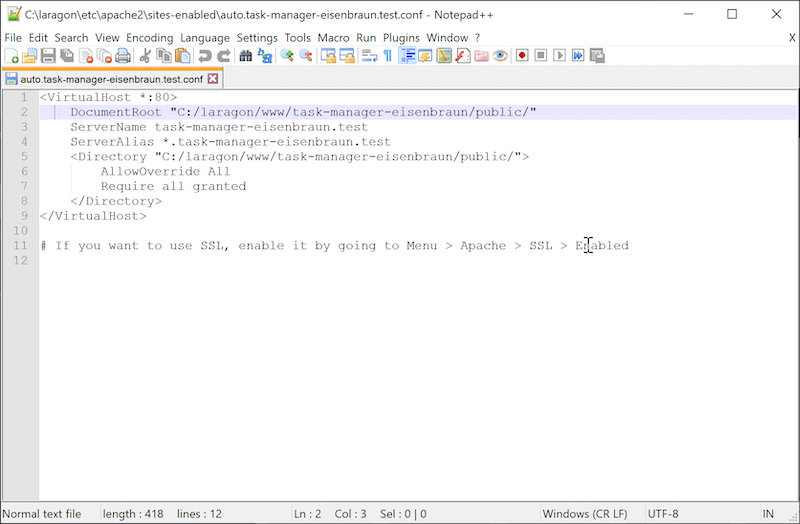
This will open a file in Notes++. From there, you will need to changes two lines, the DocumentRoot (line 2) and the <Directory> (line 5). In both lines, update the URL to include /public/ at the end.
7. Run the Migration Files
Use the provide migration files to create the database tables for the project.
In the terminal, enter the following command:
php artisan migrate
While this will create several tables, only the contacts table will be used.
8. Create Models and Controllers
A Model and Controller will need to be created for the new table added in the previous step.
To create a Model and Controller, run the following commands:
php artisan make:model Contact -c
Requirements
- Create a contact book web application that uses the Laravel Framework and a MySQL database.
- On the contact book's start view, contacts should be displayed alphabetically by the last name.
- A search box should be available to filter contacts by their first and last name.
- Clicking on a contact's name should display the contact's details view. The view should display all the information about the contact.
- A new contact form should be available. Submitting the form should create a new contact in the web application and the MySQL database. When the operation is complete, the application should display the contact's details view.
- An edit contact form should be available. Submitting the form should update a contact in the web application and the MySQL database. When the operation is complete, the application should display the contact's details view.
- A delete contact button should be available. Clicking the button should remove the contact in the web application and the MySQL database. When the operation is complete, the application should display the contact book's start view.
- The contact book application should be intuitive and easy to use, and visually applying. Students may use any open-source framework or library to assist in the UI of the application.
Example
Rubric
| Criteria | Pts |
|---|---|
| Successfully display contacts alphabetically by last name | 5 |
| Successfully implement search functionality | 6 |
| Successfully display a contact's details when contact's name is clicked | 6 |
| Successfully adds a new contact when the new contact form is submitted | 6 |
| Successfully updates a contact when the edit contact form is submitted | 6 |
| Successfully remove a contact when the delete button is clicked | 6 |
| Provides an appealing and intuitive user experience | 15 |
| Total | 50 |